
As a homeowner, there is nothing quite like opening your windows and doors to let a fresh, cool breeze circulate through your living spaces. Whether you are airing out the kitchen after cooking a hearty meal, enjoying the scent of rain from your patio, or letting the natural fragrance of your garden drift inside, fresh air transforms the indoor environment. However, this open-door invitation often welcomes unwanted guests: mosquitoes, flies, gnats, and pesky debris.
Understanding Your Screen Material Options
Maintaining a comfortable, pest-free home while preserving a beautiful view of your outdoor landscaping requires the right protection. If you are managing multiple windows, a large patio enclosure, or planning several DIY home improvements this season, buying a bulk screen is one of the smartest and most cost-effective investments you can make.
In this comprehensive guide, we will explore the different types of screen materials available, how to choose the right one for your home and garden needs, and why buying in bulk can save you time and money.
Not all screens are created equal. Depending on where you live, whether you have pets, and how much sunlight your home receives, your screening needs will vary. Here are the most popular materials used for windows, doors, and patios:
1. Fiberglass Screens
Fiberglass is the most common material used in modern residential properties. It is highly flexible, easy to work with, and does not crease or dent when struck by stray soccer balls or outdoor debris. Because it offers excellent visibility and airflow, it is perfect for kitchen windows looking out into a vibrant flower bed or a backyard vegetable patch.
2. Aluminum Screens
If you are looking for long-term durability and strength, aluminum is a classic choice. It resists rust, corrosion, and weathering remarkably well. While it is slightly more rigid than fiberglass, it holds up exceptionally well in low-traffic areas and regions with harsh weather conditions, ensuring your view of the garden remains unobstructed for years.
3. Specialty Screens: Pet and Micro-Mesh
For homes with furry companions, standard mesh might not withstand sharp claws. Pet-resistant screens are made from heavy-duty, vinyl-coated polyester that resists tears and punctures from dogs and cats. On the other hand, if you live near coastal areas or marshy wetlands where tiny insects (like no-see-ums) thrive, a micro-mesh screen features a tighter weave to keep even the smallest pests outside where they belong.
Why Buying in Bulk is the Smart Choice for Homeowners
When tackling home improvement projects, many homeowners fall into the trap of buying pre-cut, individual screen patches. While convenient for a single minor repair, this approach quickly becomes expensive and inefficient for larger properties.
Investing in larger quantities offers several undeniable benefits:
- Cost Efficiency: Purchasing materials in larger rolls significantly reduces the cost per square foot compared to retail pre-cut packages.
- Consistency Across Your Home: Replacing multiple screens at once ensures a uniform look. Mixing different brands or materials can result in mismatched colors and textures, affecting your home’s curb appeal.
- Versatility for Garden Projects: Extra screening material is incredibly useful outside of the window frame. Gardeners frequently use leftover mesh to line the bottom of raised garden beds to prevent burrowing pests, cover fruit bushes to deter birds, or create custom bug barriers for delicate seedlings.
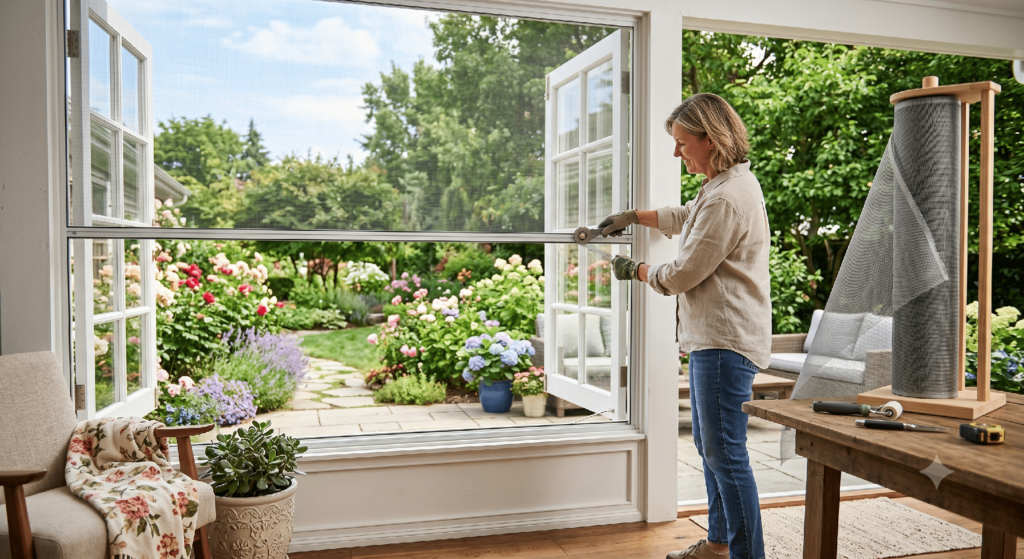
Step-by-Step: How to Replace a Window or Door Screen
Replacing a screen is a highly rewarding weekend DIY project that requires only a few basic tools: a roll of screen mesh, screen spline (the rubber cord), a spline rolling tool, and a utility knife.
- Remove the Old Screen: Take the frame out of the window or door. Use a flathead screwdriver to pull out the old rubber spline, then remove the damaged mesh.
- Clean the Frame: Wipe down the aluminum channels to remove accumulated dirt, pollen, and dust. A clean frame makes installation much smoother.
- Cut the New Mesh: Roll out your material over the frame. Cut a piece that extends about one to two inches beyond the edges of the frame on all sides.
- Roll in the Spline: Starting at one corner, use the convex side of your spline rolling tool to push the mesh into the frame channel. Then, lay the spline over the channel and use the concave wheel to press it firmly into place. Keep the screen taut but not overly tight to avoid bowing the frame.
- Trim the Excess: Once the spline is secure all the way around, use a sharp utility knife to carefully trim away the excess mesh outside the spline line.
Enjoy Your Indoor-Outdoor Sanctuary
Your home and garden should feel like a seamless sanctuary. By updating your window and patio doors with high-quality mesh, you can fully embrace natural ventilation, reduce your reliance on air conditioning during beautiful spring and autumn days, and keep your indoor spaces pristine. Take a look at your current window frames today, assess your upcoming garden projects, and make the switch to a reliable barrier that keeps nature’s best parts in and the pests out.